Wednesday, July 08, 2015

Use AMISCE tool to update BIOS configuration under linux

Use AMISCE tool to update BIOS configuration under linux

Use AMISCE tool to update BIOS configuration under linux

Test fucntion without change dump file
1.Copy SCELNX_64 to Linux_Flash folder
2.cd Linux_Flash
3#afulnx_64 /MAKEDRV
4.#afulnx_64 /GENDRV [Option 1] /    (ex:./afulnx_64 /GENDRV 2.6.32-71.e16.x86_64 /)
[Option 1]: Specific kernel source 'KERNEL=XXXX' , #uname-r to check
5.#make
6.#SCELNX_64 /o /s nvram.txt /h Hii.db /v /q
7.Reboot to BIOS, change some BIOS configuration
8.Save,boot to linux
9.Boot to OS, cd AMI_SCE folder
10.#SCELNX_64 /i /s nvram.txt  (Restore BIOS to original configuration)
11.Reboot to BIOS, check if configuration is back

--------------------------------------------------------
Change password by modify dump file
Set BIOS Administrator/User password through SCE utility:
0. Set BIOS Administrator/User password and dump nvram file(contain password) with below command
   ./SCELNX_64 /o /c /l list.txt /n nvram.txt /h hii.db
1. Dump nvram file(no password) with below command
   ./SCELNX_64 /o /c /l list.txt /n nvram.txt /h hii.db
2. Edit dumped nvram file to change "Variable Data" about AMITSESetup to set BIOS password. (see nvram.txt in step 0)

No password
Variable Name
AMITSESetup
Variable Data
00 00 00 00 00 00 00 00 00 00 00 00 00 00 00 00
00 00 00 00 00 00 00 00 00 00 00 00 00 00 00 00
00 00 00 00 00 00 00 00 00 00 00 00 00 00 00 00
00 00 00 00 00 00 00 00 00 00 00 00 00 00 00 00
00 00 00 00 00 00 00 00 00 00 00 00 00 00 00 00
01

Username /password =>是 Admin / 111111 ; User / 111
Variable Name
AMITSESetup
Variable Data
6A 93 87 26 20 BA 6C 4D C7 E0 22 74 7D 07 D8 9A
33 2E 8E C1 E9 54 44 E8 9F 7B FA 0E 55 A2 B0 35
0B C9 66 5C C1 EF 1C 83 6A 93 87 26 20 BA 5D 4D
F6 E0 13 74 7D 07 D8 9A 33 2E 8E C1 E9 54 44 E8
9F 7B FA 0E 55 A2 B0 35 0B C9 66 5C C1 EF 1C 83
00

3. Update nvram file to system using following command.
   ./SCELNX_64 /i /l list.txt /n nvram.txt
4. Reset system and check if BIOS password is set.


Refer:
ftp://12.230.196.227/joel_drivers/BIOS%20Flash%20Utilities/Linux%20Bios%20Flash%20Procedure/UEFI/v2.37/ROMUtils_2.37/LNX/afulnx32/readme_afulnx.txt
Friday, February 13, 2015

Wednesday, January 07, 2015

Which vCenter Server platform should I use - Appliance or Windows? | VMware vSphere Blog - VMware Blogs

Which vCenter Server platform should I use - Appliance or Windows? | VMware vSphere Blog - VMware Blogs


Step 1 – What features are missing?
This used to be a bigger problem than it is today. The only things we are missing at this point with the vCenter Server appliance are Linked Mode, vCenter Server Heartbeat (EoA) and SQL Server support. If you need any of these features, its game over, stick to the vCenter Server on Windows.
Step 2 – Figure out the scale limits.The embedded database that is preinstalled with the vCenter Server appliance will support an inventory size of up to 100 vSphere hosts and/or 3,000 Virtual Machines when sized appropriately. If your scale requirements are higher, is anexternal database an option?  You can use an external database to meet the vCenter maximum scale of up to 1,000 vSphere hosts and/or 10,000 Virtual Machines. However the only external supported database with the vCenter Server appliance is Oracle. If you are a SQL Server shop, the vCenter Server appliance is not for you.
Step 3 – Do you have any operational/environmental/regulatory requirements?
The vCenter Server appliance is delivered on a SUSE distribution, however VMware does not update the OS level patches and hotfixes as they become available, VMware publishes release updates containing the accumulated patches and hotfixes and in the case of vCenter Server, this could be 6 months out (we do deliver critical security patches (ie Heartbleed). Other considerations include 3rd party agentstweaking Linux settings and removing things aren’t supported. Backup requirements, too, are sometimes a challenge (if, for instance, the database team requires that databases be backed up separately to the virtual appliance).
Step 4 – Using the appliance, today, still requires a certain amount of Linux expertise.
Many customers assume that we’re further down the “lock it down and hide Linux” road than we actually are. I’ve spoken to customers who were excited about moving to the vCenter Server appliance because “we don’t have to worry about the OS, any more.” This may not be true if you get into a troubleshooting scenario or require additional configuration settings.
Step 5 – Migrating to the vCenter Server appliance
Ok so you may have survived the first few steps and ready to adopt the vCenter Server appliance but getting to it maybe more of a challenge. We do not have any migration/data tools available to move your vCenter Server on Windows to the vCenter Server appliance. You will have to deploy a fresh vCenter Server appliance and manually recreate the configuration and manually move the vSphere hosts over to the new vCenter Server appliance. Do you have any auditory requirements? historical data will be lost with the manual migration process and vCOPs will see the vCenter Server appliance as a new vCenter Server environment. This manual process could be eased with the use of PowerCLI but unique to each environment. Using an existing vCenter Server database is not an option.

Tuesday, December 30, 2014

ELRepo : kernel-ml

ELRepo : kernel-ml


kernel-ml

Kernel-ml for Enterprise Linux 7.

The kernel-ml packages are built from the sources available from the "mainline stable" branch of The Linux Kernel Archives (external link). The kernel configuration is based upon the default RHEL-7 configuration with added functionality enabled as appropriate. The packages are intentionally named kernel-ml so as not to conflict with the RHEL-7 kernels and, as such, they may be installed and updated alongside the regular kernel.

To install kernel-ml you will need elrepo-release-7.0-1.el7.elrepo (or newer). Run:

yum --enablerepo=elrepo-kernel install kernel-ml

You can also Download manually from http://elrepo.org/linux/kernel/el7/ (external link)
(Or from one of our mirror sites, if one is more conveniently located closer to you.)

There is no need to install the kernel-ml-headers package. It is only necessary if you intend to rebuild glibc and, thus, the entire operating system. If there is a need to have the kernel headers installed, you should use the current distributed kernel-headers package as that is related to the current version of glibc.

Notes

These packages are provided 'As-Is' with no implied warranty or support. Using the kernel-ml may expose your system to security, performance and/or data corruption issues. Since timely updates may not be available from the ELRepo Project, the end user has the ultimate responsibility for deciding whether to continue using the kernel-ml packages in regular service.

If a bug is found when using these kernels, the end user is encouraged to report it upstream to the Linux Kernel Bug Tracker (external link) and, for our reference, to the ELRepo bug tracker. By taking such action, the reporter will be assisting the kernel developers, Red Hat and the Open Source Community as a whole.

Kernel-ml for Enterprise Linux 6.

The kernel-ml packages are built from the sources available from the "mainline stable" branch of The Linux Kernel Archives (external link). The kernel configuration is based upon the default RHEL-6 configuration with added functionality enabled as appropriate. The packages are intentionally named kernel-ml so as not to conflict with the RHEL-6 kernels and, as such, they may be installed and updated alongside the regular kernel.

To install kernel-ml you will need elrepo-release-6-4.el6.elrepo (or newer). Run:

yum --enablerepo=elrepo-kernel install kernel-ml

You can also Download manually from http://elrepo.org/linux/kernel/el6/ (external link)
(Or from one of our mirror sites, if one is more conveniently located closer to you.)

There is no need to install the kernel-ml-firmware package. There are more firmware files contained within the distro package than in the kernel-ml-firmware package.

There is no need to install the kernel-ml-headers package. It is only necessary if you intend to rebuild glibc and, thus, the entire operating system. If there is a need to have the kernel headers installed, you should use the current distributed kernel-headers package as that is related to the current version of glibc.

Notes

These packages are provided 'As-Is' with no implied warranty or support. Using the kernel-ml may expose your system to security, performance and/or data corruption issues. Since timely updates may not be available from the ELRepo Project, the end user has the ultimate responsibility for deciding whether to continue using the kernel-ml packages in regular service.

If a bug is found when using these kernels, the end user is encouraged to report it upstream to the Linux Kernel Bug Tracker (external link) and, for our reference, to the ELRepo bug tracker. By taking such action, the reporter will be assisting the kernel developers, Red Hat and the Open Source Community as a whole.

Known Issues

(1) As of kernel-ml-3.10.5-1.el6.elrepo, kernel-ml installed as a KVM guest will panic upon booting (FATAL: Module scsi_wait_scan not found error). This is because virtio_blkis not in the initramfs. More details can be found in:

http://elrepo.org/bugs/view.php?id=401 (external link)
https://bugzilla.kernel.org/show_bug.cgi?id=60758 (external link)

A workaround is to rebuild initramfs with a "--add-drivers virtio_blk" option. For example:

dracut --add-drivers virtio_blk -f /boot/initramfs-3.10.5-1.el6.elrepo.x86_64.img 3.10.5-1.el6.elrepo.x86_64

(2) As of kernel-ml-3.12.2-1.el6.elrepo, the userland process acpid will fail. This was caused by a change in the upstream kernel source which dropped support for the acpid-1 interface, as used by RHEL-6. See the following links for more details:

http://elrepo.org/bugs/view.php?id=435 (external link)
https://bugzilla.kernel.org/show_bug.cgi?id=66681 (external link)

Users of the kernel-ml package are encouraged to install the acpid-2 package to restore system acpi functionality. (It is believed that the acpid-2 package will also work with the distribution kernel but this has not been fully verified.)


Page last modified on Monday 13 of October, 2014 10:02:47 MDT

Tuesday, December 23, 2014

wakkadoo tech: How to Reset Rocks Root Account

wakkadoo tech: How to Reset Rocks Root Account


If root password or mysql root password were changed, follow procedure below to reset root password in mysql and create .rocks.my.cnf file. 
 
Stop Rocks foundation-mysql 
  • /etc/init.d/foundation-mysql stop 
Start mysql with options below 
  • /etc/init.d/foundation-mysql start --skip-grant-tables 
Connect to Mysql using Rocks, not OS MySql 
  • /opt/rocks/bin/mysql -u root 
  • Select the database 
    • mysql> use mysql; 
  • Update the password 
    • mysql> update user set password=PASSWORD("newrootpassword") where User='root'; 
  • Flush privileges 
    • mysql> flush privileges; 
  • Exit  
    • mysql> quit 

Thursday, December 18, 2014

Memory scrubbing - Wikipedia, the free encyclopedia

Memory scrubbing - Wikipedia, the free encyclopedia


Memory scrubbing consists of reading from each computer memory location, correcting bit errors (if any) with an error-correcting code (ECC), and writing the corrected data back to the same location.[1]

Motivation[edit]

Due to the high integration density of contemporary computer memory chips, the individual memory cell structures became small enough to be vulnerable to cosmic rays and/or alpha particle emission. The errors caused by these phenomena are called soft errors. This can be a problem forDRAM and SRAM based memories.
The probability of a soft error at any individual memory bit is very small. But,
  • together with the large amount of memory with which computers - especially servers - are equipped nowadays,
  • and together with several months of uptime,
the probability of soft errors in the total memory installed is significant.

ECC support[edit]

The information in an ECC memory is stored redundantly enough to correct single bit error per memory word. Hence, an ECC memory can support the scrubbing of the memory content. Namely, if the memory controller scans systematically through the memory, the single bit errors can be detected, the erroneous bit can be determined using the ECC checksum, and the corrected data can be written back to the memory.

More detail[edit]

It is important to check each memory location periodically, frequently enough, before multiple bit errors within the same word are too likely to occur, because the one bit errors can be corrected, but the multiple bit errors are not correctable, in the case of usual (as of 2008) ECC memory modules.
In order to not disturb regular memory requests from the CPU and thus prevent decreasing performance, scrubbing is usually only done during idle periods. As the scrubbing consists of normal read and write operations, it may increase power consumption for the memory compared to non-scrubbing operation. Therefore, scrubbing is not performed continuously but periodically. For many servers, the scrub period can be configured in the BIOSsetup program.
The normal memory reads issued by the CPU or DMA devices are checked for ECC errors, but due to data locality reasons they can be confined to a small range of addresses and keeping other memory locations untouched for a very long time. These locations can become vulnerable to more than one soft error, while scrubbing ensures the checking of the whole memory within a guaranteed time.
On some systems, not only the main memory (DRAM-based) is capable of scrubbing but also the CPU caches (SRAM-based). On most systems the scrubbing rates for both can be set independently. Because cache is much smaller than the main memory, the scrubbing for caches does not need to happen as frequently.
Memory scrubbing increases reliability, therefore it can be classified as a RAS feature.

Variants[edit]

Patrol scrub[edit]

Patrol scrubbing is a process that allows the CPU to correct correctable memory errors detected on a memory module and send the correction to the requestor (the original source). When this item is set to "enabled", the northbridge will read and write back one cache line every 16K cycles, if there is no delay caused by internal processing. By using this method, roughly 64 GB of memory behind the northbridge will be scrubbed every day.
Options on motherboards are usually "enabled" or "disabled".

Demand scrub[edit]

Demand scrubbing is a process that allows the CPU to correct correctable memory errors found on a memory module. When the CPU or I/O issues a demand-read command, and the read data from memory turns out to be a correctable error, the error is corrected and sent to the requestor (the original source). Memory is updated as well.
Options on motherboards are usually "enabled" or "disabled".

Friday, December 12, 2014

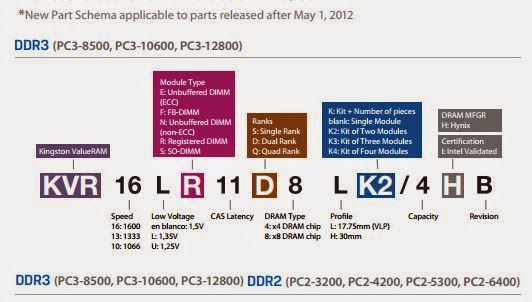
Memory Kingston naming convention and guide


Rank: Single, Dual, Quad Rank Memory Modules

Important when installing memory modules in workstations and

servers. If the total number of ranks installed exceeds the system’s

memory speci cations, the system may not boot, may have memory

errors, or may not recognize part of the memory capacity. Check your

system’s user guide for supported number of ranks.


x4 or x8 DRAM Organization

Registered DIMMs for servers are available with x4 (“By 4”) or x8 DRAM

chips. x8-based server modules are generally more cost-e ective but

only x4-based server modules can support server features such as

multiple-bit error correction, Chipkill, memory scrubbing, and Intel

Single Device Data Correction (SDDC).


Capacity

Total number of memory cells on a module expressed in Megabytes

or Gigabytes. For kits, listed capacity is the combined capacity of all

modules in the kit.


CAS Latency

One of the most important latency (wait) delays (expressed in clock

cycles) when data is accessed on a memory module. Once the data

read or write command and the row/column addresses are loaded, CAS

Latency represents the ( nal) wait time until the data is ready to be read

or written.


DDR3

Third-generation DDR memory technology. DDR3 memory modules

are not backward-compatible with DDR or DDR2 due to lower

voltage (1.5V), di erent pin con gurations and incompatible memory

chip technology.


ECC

(Error Correction Code) A method of checking the integrity of the data

stored in the DRAM module. ECC can detect multiple-bit errors and can

locate and correct single-bit errors.


Intel Validated

Parts with this designation have been validated by Intel’s authorized

validation lab for their server platforms.


Thursday, December 04, 2014

Distributed File Systems: Ceph vs Gluster vs Nutanix

In the new world of cloud computing, storage is one of the most difficult problems to solve. Cloud storage needs to easily scale out, while keeping the cost of scaling as low as possible, without sacrificing reliability or speed and avoiding the inevitable failure of hardware as storage scales up.  Three of the most innovative storage platform technologies are entirely software based and run on commodity hardware as distributed file systems.
You might be asking yourself, what exactly is a cloud distributed file system? In cloud computing, a distributed file system is any file system that allows access of files from multiple hosts sharing a computer network. This makes it possible for multiple users on multiple machines to share files and storage resources. Distributed file systems differ in the way they handle performance, concurrent writes, permanent or temporary loss of nodes or storage and their policy of storing content.
Below we have outlined three of the most innovative software distributed file systems and why you would choose one over the other for your public or private cloud environment.

Gluster

Gluster is an open source distributed file system that can scale to massive size for both public and private clouds. The GlusterFS architecture aggregates compute, storage, and I/O resources into a global namespace. Each server and its attached commodity storage are considered a node.Capacity is scaled by adding additional nodes or adding additional storage to each node. Performance is increased by deploying storage among more nodes and high availability is achieved by replicating data between nodes.
The GlusterFS hashing algorithm is distributed to all of the servers in the cluster managing file placement on each of its building blocks. There is no single server that manages metadata or the cluster. Its design is well suited to store a massive amount of files in a single global name space.  Gluster features a modular design, using what it calls translators, to give additional options beyond simple file distribution. Translators extend the base functionally by offering the ability to easily change redundancy or stripe the data across the cluster.  With the recent addition of native support for Gluster’s libgfapi into KVM+QEMU, gluster backed block devices and alpha stage native integration into Apache CloudStack Gluster is making a compelling offering for virtual machine storage.
Gluster is ideal for installations that require massive numbers of files to be distributed and available on hundreds of hosts. Recent additions make it useful as virtual machine backing for clusters that contain tens of storage hosts.

Ceph

Like Gluster, Ceph is an open source storage platform designed to massively scale, but it has taken a fundamentally different approach to the problem. At its base, Ceph is a distributed object store , called RADOS, that interfaces with an object store gateway, a block device or a file system. Ceph has a very sophisticated approach to storage that allows it to be a single storage backend with lots of options built in, all managed through a single interface. Ceph also features native integration with KVM+QEMU. It also has tested support for Apache CloudStack cloud orchestration for both primary storage running virtual machines and as an image store using the S3 or Swift interface.
Aside from a variety of support storage interfaces, Ceph offers compelling features that can be enabled depending your workloads. Pools of storage can have a read-only or write-back caching tier. The physical location of data can be managed using CRUSH maps whereas snapshots can be handled entirely by the storage backend.
Ceph is versatile and can be tuned to any environment for any storage need.  It also has the ability to gracefully scale to 1000s of hosts.  Ceph is an excellent candidate for use on any task where a distributed file system would be used.
Like Gluster, Ceph is designed to run on commodity hardware to effectively deal with the inevitable failure of hardware. Recently, Red Hat acquired both Gluster and Inktank, the designers of Ceph. Red Hat intends to integrate both storage technologies into their current product line.

Nutanix

Nutanix distributed file system converges storage and compute into a single appliance based on commodity hardware. Like Gluster and Ceph, Nutanix features a scale out design that allows it to achieve redundancy and reliability while managing the inevitable hardware failures of scale.  
One of the main features of Nutanix is that it uses solid-state drives in each appliance node to store hot data. This allows Nutanix to automatically shuffle hot data between the faster and slower disks as it becomes hot and cold. Nutanix storage architecture also features deduplication and compression.
It currently isn’t supported by CloudStack; however Nutanix supports NFS and iSCSI which allows it to be used with most hypervisors that are found in an enterprise. The self management capability of storage makes Nutanix one of the most turn key solutions on the market.  
As you can see there are many types of distributed file systems in the market today and storage is typically one of the harder components when architecting a cloud solution. It is important to understand the difference between the top distributed file systems so you can find the storage solution that is right for your business.

Thursday, October 02, 2014

AnandTech | Intel Xeon E5 Version 3: Up to 18 Haswell EP Cores - Print View

Memory Subsystem Bandwidth

Let's set the stage first and perform some meaningful low level benchmarks. First, we measured the memory bandwidth in Linux. The binary was compiled with the Open64 compiler 5.0 (Opencc). It is a multi-threaded, OpenMP based, 64-bit binary. The following compiler switches were used:
-Ofast -mp -ipa
The results are expressed in GB per second. Note that we also tested with gcc 4.8.1 and compiler options
-O3 –fopenmp –static
Results were consistently 20% to 30% lower with gcc, so we feel our choice of Open64 is appropriate. Everybody can reproduce our results (Open64 is freely available) and since the binary is capable of reaching higher speeds, it is easier to spot speed differences. First we compared our DDR4-2133 LRDIMMs with the Registered DDR4-2133 DIMMs on the Xeon E5-2695 v3 (14 cores at 2.3GHz, Turbo up to 3.6GHz).

Friday, September 26, 2014

Four new virtualization technologies on the latest Intel Xeon 解读


OK,Chinese notes for those 4 features of E5v3 CPU on Virtualization side:


当然, 新技术都是Intel VT技术的部分子集.(BIOS中对映的,关闭就没有了.)


Cache Monitoring Technology (CMT)

其实是Cache Qos monitoring, 反正差不多. 本功能允许实时监控LLC(last level cache, L3 cache)中被每个VM占用的情况. 实现方法原文里面有, 不再罗嗦. 这个功能可以做到发现那些使用cache超常的VM, 从而可以针对这种情况, 通过编程,制定具体的策略, 不同的策略实现不同的功能, 基本上就是看, 发现占用大量内存的VM后, 我们的打算怎么处理这个情况. 具体的编程规则, 原文里面有注明. 但是我的理解是这个应该是写Hypervisor的人操心的事了, 对于一般用户来讲如果Hypervisor实现了,也就照着策略用了, 可能写好几种情况, 让用户自选. 但估计大部分人还是使用默认策略. 也就这样了. 
下一代技术, 内存带宽也是可以监控的了.


VMCS Shadowing

加速, 给在虚拟机上开虚拟机的情况加速.底层的hypervisor特性传递给第二层的hypervisor从而做到加速,使得第二层hpervisor消耗极小的资源. 为什么要在虚拟机上开虚拟机呢, 有点类似于盗梦空间.原因一, 省钱. 比如说在云上卖了一台机器的使用权吧, 你可以在上面装个Hypervisor,性能几乎不影响, 然后再在上面开出4台机器来,花了1台的前,用了4台机器不错吧,基本上这是一个云的打包虚拟化的概念.这么多还有第二个好处, 控制权. 第二层的这些机器,自己随便调.另外, 其他的例如软件开发,实验环境,培训和安全角度看,还是有很多情况需要多重梦境的, 不多重虚拟的. 值得一提的是, 当前VMCS Shadowing已经在KVM 3.1和Xen 4.3中了支持了. 个人偏好KVM, RHEL/CentOS 7里面自带的是KVM3.10,Xen种种原因不太推荐了就.实测数据也已经有了, >58%的kernel build加速, >50%的CPU信号降低, 和125%的IO提速, 证明VMCS Shadowing在多重虚拟下还是值得拥有的. 但是对一般不需要多重虚拟的普通用户来讲...没啥用.


Extended Page Table Accessed and Dirty bits (EPT A/D bits)

好长的名字...这个是在虚机迁移的时候用的技术. 可以认为是内存虚拟化

A/D位, 是一个标记位. EPT(Extended Page Table)是一个对映虚机的虚拟硬件内存地址和宿主机的物理地址的表格. 由于虚拟的内存对于虚拟机来说是要连续的, 但宿主机可以用不连续的内存给VM, 所以EPT是必然存在的. 有点类似与, 一个txt文件我们看到内容是连续的, 但是在磁盘上存放可能并不连续, 可以类似理解为文件系统中的FAT表. A/D bit,就是在VM迁移时的标记,告诉机器哪些已经迁移了, 不在旧的机器上了,那些还没有移. 新数据进来一看就知道该在新机器上去写还是还在旧机器上写数据了, 先把没有盖面的数据移了, 频繁改动的放最后. 最关键的是现在是硬件支持了. 在KVM 3.6里面已经有了, 再说一下CentOS的是3.10, 支持. Xen4.3支持, VMWare叫SLAT, 3天前发出文章来, 貌似也支持.(http://www.unixarena.com/2014/09/vmware-hardware-compatibility-guide.html)


Data Direct IO Enhancements

BIOS里和VT-d对映, IO虚拟化.

一直有的技术, 新v3做了些提高. 通过定义个别的硬件资源, 一般是PCIe上的, 比如网卡, GPU. 直接使VM的CPU core直接使用对映的资源, 从而达到加速的效果. 但是, 需要Hypervisor中代码实现.(目前大部分都支持了), 还有就是, 做了直接映射访问IO资源后, 在迁移VM的时候可能遇到麻烦.

PS:补个图, 从图中可以看出来Intel虚拟化技术的分类情况, 和现有的技术.


PSS:除了最后一个以外, 上面3个都是需要VMM支持的, 也需要在VMM中打开才可以真的发挥作用.